2021-10-19 00:16:29 +00:00
|
|
|
|
# 【Cocos Creator实战教程(3)】——TiledMap(瓦片地图)组件
|
2021-10-19 00:17:30 +00:00
|
|
|
|
|
2021-10-19 00:16:29 +00:00
|
|
|
|
# 1. 前言
|
|
|
|
|
|
|
|
|
|
|
|
瓦片地图是由一张一张的正方形小图片拼接成的地图,例如炸弹人,QQ堂都是非常典型的瓦片游戏。瓦片地图(Tile Map) 不但生成简单,并且可以灵活的用于Cocos2d-x引擎。不论你的游戏是角色扮演游戏, 平台动作游戏或仿打砖块游戏,这些游戏地图可以使用开源的瓦片地图编辑器Tiled Map Editor生成并保存为TMX文件格式,被Cocos2d-x支持。
|
|
|
|
|
|
|
|
|
|
|
|
# 2. 步骤
|
|
|
|
|
|
|
|
|
|
|
|
## 2.1 安装Tiled Map Editor
|
|
|
|
|
|
|
|
|
|
|
|
edit(编辑)->preferences(参数)里面可以设置语言
|
|
|
|
|
|
|
|
|
|
|
|
## 2.2 TiledMap制作
|
|
|
|
|
|
|
|
|
|
|
|
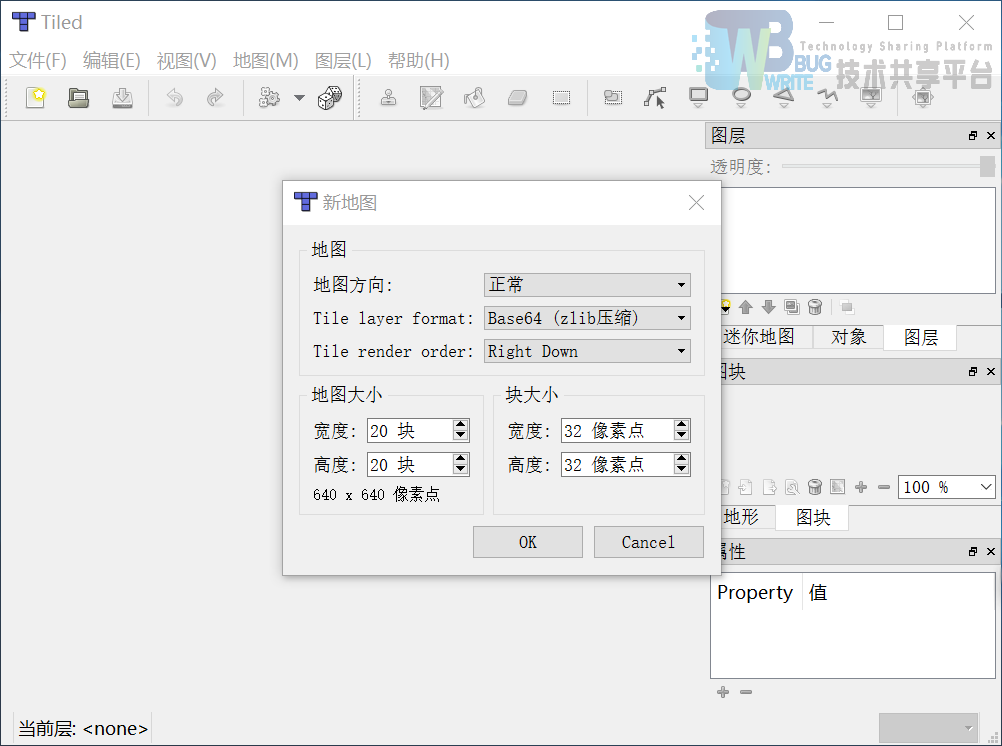
新建一张地图
|
|
|
|
|
|
|
2021-10-19 07:57:59 +00:00
|
|
|
|
|
2021-10-19 00:16:29 +00:00
|
|
|
|
|
|
|
|
|
|
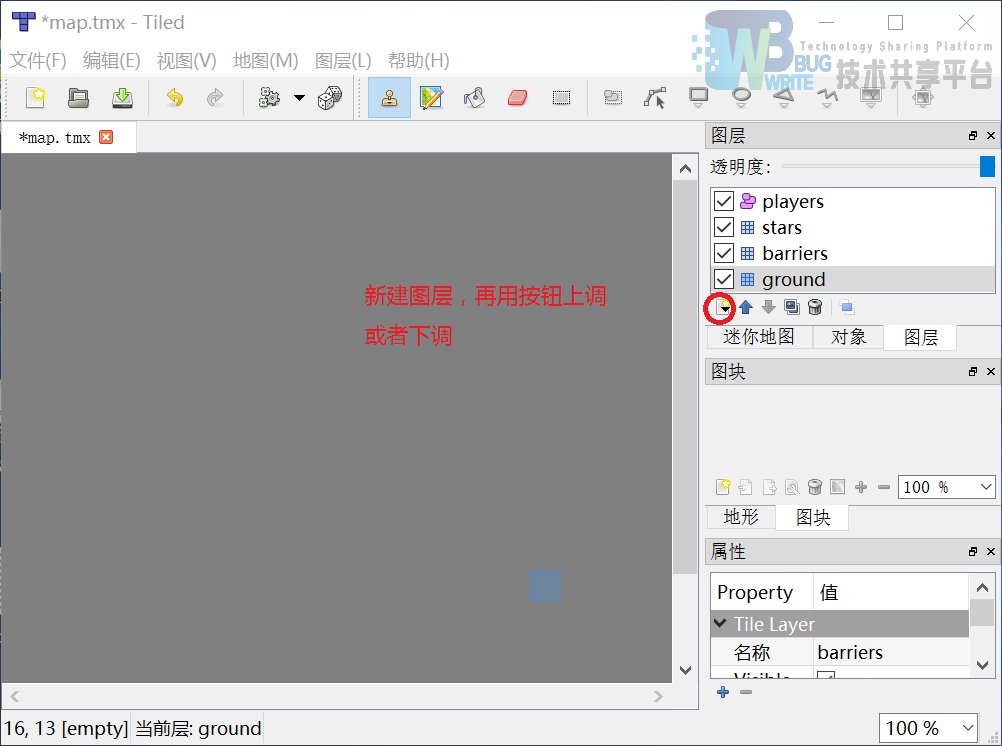
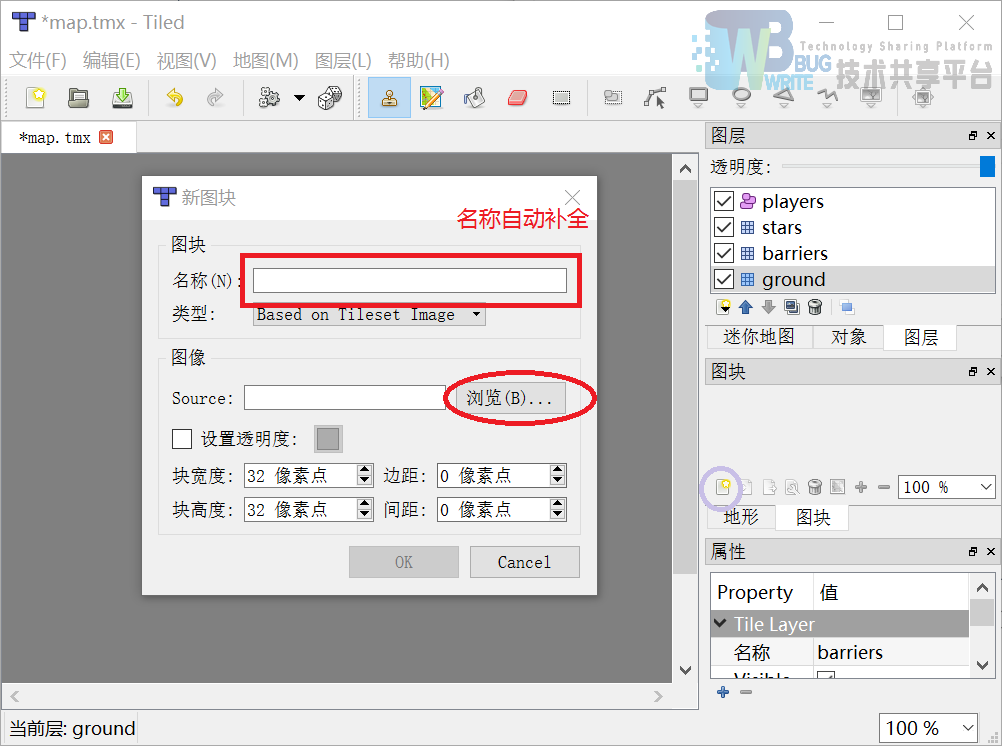
建立三个图层和一个对象层并将资源图块导入 (最下面的图层将显示在最下面)
|
|
|
|
|
|
|
2021-10-19 07:57:59 +00:00
|
|
|
|
|
2021-10-19 00:16:29 +00:00
|
|
|
|
|
2021-10-19 07:57:59 +00:00
|
|
|
|
|
2021-10-19 00:16:29 +00:00
|
|
|
|
|
|
|
|
|
|
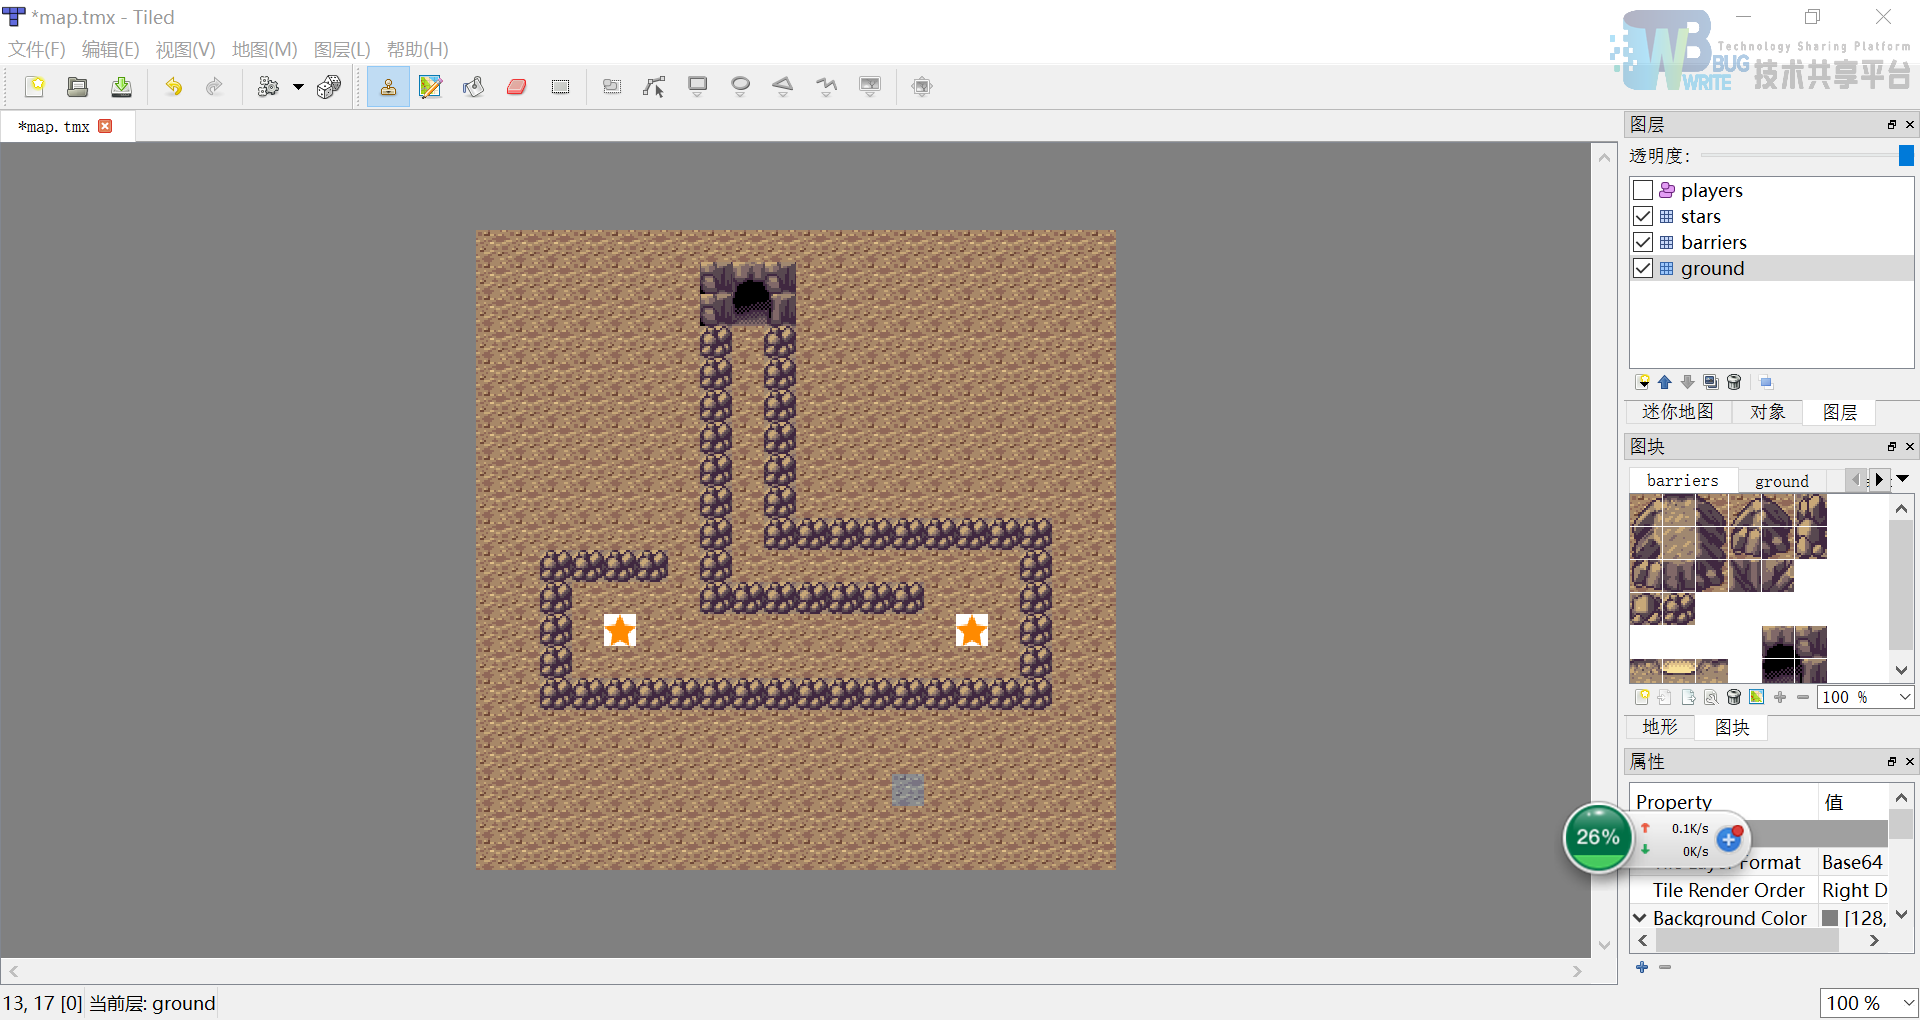
- ground层:用ground图块填充满(按住鼠标左键)
|
|
|
|
|
|
|
|
|
|
|
|
- barriers层:用barrier图块
|
|
|
|
|
|
|
|
|
|
|
|
- stars层:用star图块
|
|
|
|
|
|
|
|
|
|
|
|
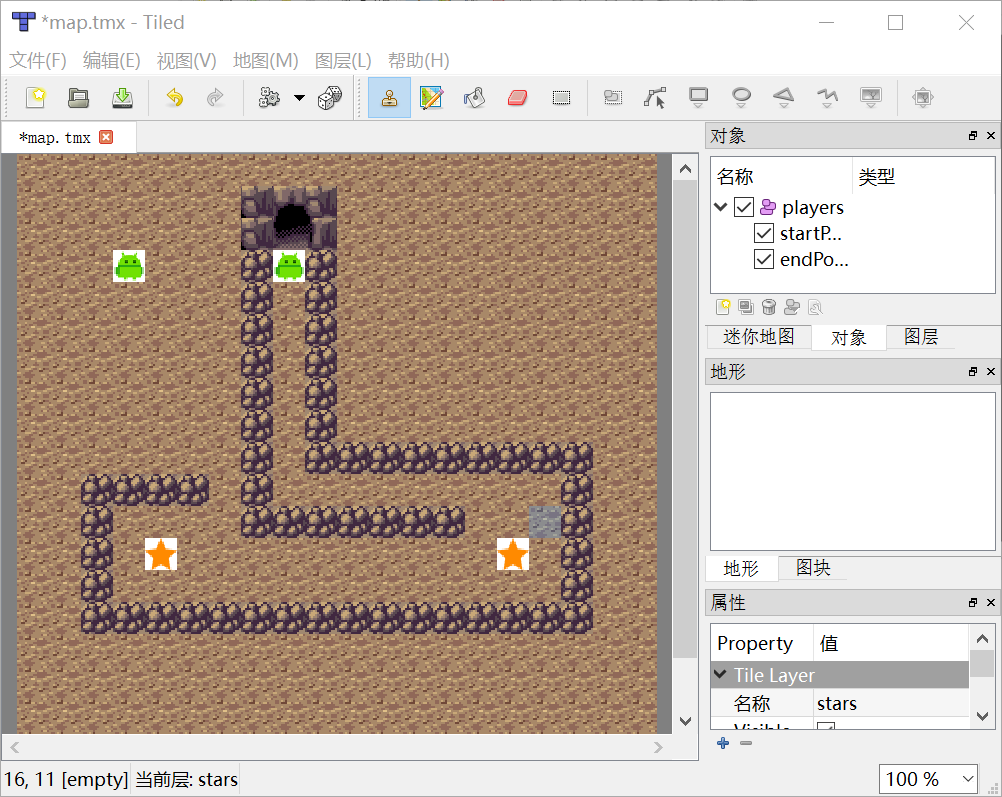
最终效果如下图
|
|
|
|
|
|
|
2021-10-19 07:57:59 +00:00
|
|
|
|
|
2021-10-19 00:16:29 +00:00
|
|
|
|
|
|
|
|
|
|
选择players对象层,在如图位置插入两个图块对象,并更改名称如图
|
|
|
|
|
|
|
2021-10-19 07:57:59 +00:00
|
|
|
|
|
2021-10-19 00:16:29 +00:00
|
|
|
|
|
|
|
|
|
|
给星星添加一个属性
|
|
|
|
|
|
|
2021-10-19 07:57:59 +00:00
|
|
|
|

|
2021-10-19 00:16:29 +00:00
|
|
|
|
|
|
|
|
|
|
保存为tmx文件,和图片文件放在一起
|
|
|
|
|
|
|
|
|
|
|
|
### 2.3 Cocos Creator中使用TiledMap:
|
|
|
|
|
|
|
|
|
|
|
|
- 新建一个TiledMapTest工程,创建一个Game场景
|
|
|
|
|
|
|
|
|
|
|
|
- 将刚才生成的tmx文件和相关图片一起添加到工程
|
|
|
|
|
|
|
|
|
|
|
|
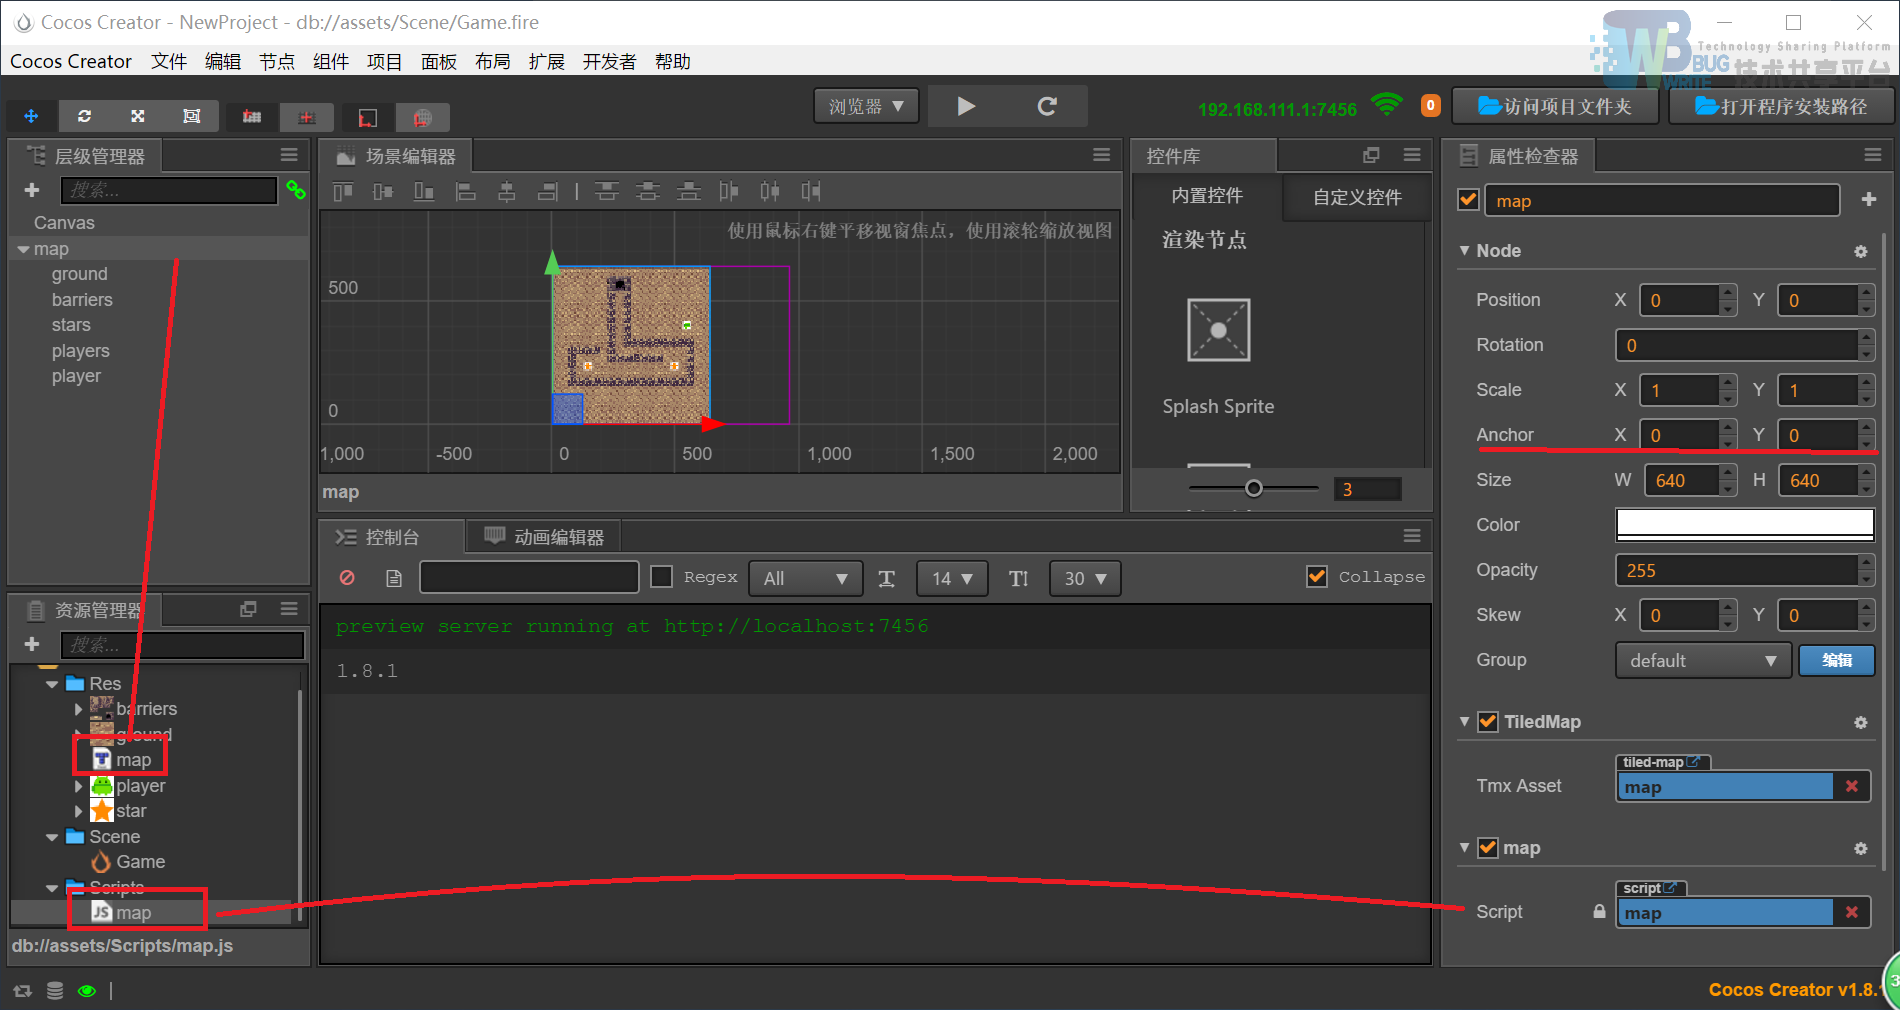
- 将map.tmx文件拖入层级管理器或者属性编辑器,就会自动生成map节点以及其子节点(也就是图层节点)【没有对象层节点】
|
|
|
|
|
|
|
|
|
|
|
|
- 最后将player(安卓小机器人)图片拖入(位置随意),创建player节点,并使其为map节点的子节点。
|
|
|
|
|
|
|
|
|
|
|
|
- 调整map和player节点的锚点都为(0,0)也就是左下角
|
|
|
|
|
|
|
|
|
|
|
|
- 创建map.js脚本添加到map节点
|
|
|
|
|
|
|
|
|
|
|
|
```javascript
|
|
|
|
|
|
cc.Class({
|
|
|
|
|
|
extends: cc.Component,
|
|
|
|
|
|
|
|
|
|
|
|
properties: {
|
|
|
|
|
|
},
|
|
|
|
|
|
|
|
|
|
|
|
// use this for initialization
|
|
|
|
|
|
onLoad: function () {
|
|
|
|
|
|
this.player = this.node.getChildByName('player');
|
|
|
|
|
|
this.loadMap();
|
|
|
|
|
|
|
|
|
|
|
|
cc.systemEvent.on(cc.SystemEvent.EventType.KEY_DOWN, this.onKeyDown, this);
|
|
|
|
|
|
},
|
|
|
|
|
|
|
|
|
|
|
|
onKeyDown:function(event){
|
|
|
|
|
|
var newTile = cc.p(this.playerTile.x, this.playerTile.y);
|
|
|
|
|
|
switch(event.keyCode) {
|
|
|
|
|
|
case cc.KEY.up:
|
|
|
|
|
|
newTile.y -= 1;
|
|
|
|
|
|
break;
|
|
|
|
|
|
case cc.KEY.down:
|
|
|
|
|
|
newTile.y += 1;
|
|
|
|
|
|
break;
|
|
|
|
|
|
case cc.KEY.left:
|
|
|
|
|
|
newTile.x -= 1;
|
|
|
|
|
|
break;
|
|
|
|
|
|
case cc.KEY.right:
|
|
|
|
|
|
newTile.x += 1;
|
|
|
|
|
|
break;
|
|
|
|
|
|
default:
|
|
|
|
|
|
return;
|
|
|
|
|
|
}
|
|
|
|
|
|
this.tryMoveToNewTile(newTile);
|
|
|
|
|
|
},
|
|
|
|
|
|
|
|
|
|
|
|
//加载地图文件时调用
|
|
|
|
|
|
loadMap: function () {
|
|
|
|
|
|
//初始化地图位置
|
|
|
|
|
|
this.node.setPosition(cc.visibleRect.bottomLeft);
|
|
|
|
|
|
//地图
|
|
|
|
|
|
this.tiledMap = this.node.getComponent(cc.TiledMap);
|
|
|
|
|
|
//players对象层
|
|
|
|
|
|
let players = this.tiledMap.getObjectGroup('players');
|
|
|
|
|
|
//startPoint和endPoint对象
|
|
|
|
|
|
let startPoint = players.getObject('startPoint');
|
|
|
|
|
|
let endPoint = players.getObject('endPoint');
|
|
|
|
|
|
//像素坐标
|
|
|
|
|
|
let startPos = cc.p(startPoint.offset.x, startPoint.offset.y);
|
|
|
|
|
|
let endPos = cc.p(endPoint.offset.x, endPoint.offset.y);
|
|
|
|
|
|
//障碍物图层和星星图层
|
|
|
|
|
|
this.barriers = this.tiledMap.getLayer('barriers');
|
|
|
|
|
|
this.stars = this.tiledMap.getLayer('stars');
|
|
|
|
|
|
//出生Tile和结束Tile
|
|
|
|
|
|
this.playerTile = this.startTile = this.getTilePos(startPos);
|
|
|
|
|
|
this.endTile = this.getTilePos(endPos);
|
|
|
|
|
|
//更新player位置
|
|
|
|
|
|
this.updatePlayerPos();
|
|
|
|
|
|
},
|
|
|
|
|
|
|
|
|
|
|
|
tryMoveToNewTile: function(newTile) {
|
|
|
|
|
|
let width = this.tiledMap.node.width;
|
|
|
|
|
|
let height = this.tiledMap.node.height;
|
|
|
|
|
|
if (newTile.x < 0 || newTile.x >= width) return;
|
|
|
|
|
|
if (newTile.y < 0 || newTile.y >= height) return;
|
|
|
|
|
|
|
|
|
|
|
|
if (this.barriers.getTileGIDAt(newTile)) {//GID=0,则该Tile为空
|
|
|
|
|
|
cc.log('This way is blocked!');
|
|
|
|
|
|
return false;
|
|
|
|
|
|
}
|
|
|
|
|
|
|
|
|
|
|
|
this.tryCatchStar(newTile);
|
|
|
|
|
|
|
|
|
|
|
|
this.playerTile = newTile;
|
|
|
|
|
|
this.updatePlayerPos();
|
|
|
|
|
|
|
|
|
|
|
|
if (cc.pointEqualToPoint(this.playerTile, this.endTile)) {
|
|
|
|
|
|
cc.log('succeed');
|
|
|
|
|
|
}
|
|
|
|
|
|
},
|
|
|
|
|
|
|
|
|
|
|
|
tryCatchStar: function(newTile){
|
|
|
|
|
|
let GID = this.stars.getTileGIDAt(newTile);
|
|
|
|
|
|
let prop = this.tiledMap.getPropertiesForGID(GID);
|
|
|
|
|
|
|
|
|
|
|
|
if (this.stars.getTileGIDAt(newTile)) {//GID=0,则该Tile为空
|
|
|
|
|
|
this.stars.removeTileAt(newTile);
|
|
|
|
|
|
}
|
|
|
|
|
|
|
|
|
|
|
|
|
|
|
|
|
|
},
|
|
|
|
|
|
|
|
|
|
|
|
//将像素坐标转化为瓦片坐标
|
|
|
|
|
|
getTilePos: function(posInPixel) {
|
|
|
|
|
|
let mapSize = this.node.getContentSize();
|
|
|
|
|
|
let tileSize = this.tiledMap.getTileSize();
|
|
|
|
|
|
let x = Math.floor(posInPixel.x / tileSize.width);
|
|
|
|
|
|
let y = Math.floor(posInPixel.y / tileSize.height);
|
|
|
|
|
|
return cc.p(x, y);
|
|
|
|
|
|
},
|
|
|
|
|
|
|
|
|
|
|
|
updatePlayerPos: function() {
|
|
|
|
|
|
let pos = this.barriers.getPositionAt(this.playerTile);
|
|
|
|
|
|
this.player.setPosition(pos);
|
|
|
|
|
|
},
|
|
|
|
|
|
|
|
|
|
|
|
});
|
|
|
|
|
|
|
|
|
|
|
|
```
|
|
|
|
|
|
|
|
|
|
|
|
最终如下图:
|
|
|
|
|
|
|
2021-10-19 07:57:59 +00:00
|
|
|
|
|
2021-10-19 00:16:29 +00:00
|
|
|
|
|
|
|
|
|
|
# 3. 总结
|
|
|
|
|
|
|
|
|
|
|
|
```javascript
|
|
|
|
|
|
# CC.TiledMap:
|
|
|
|
|
|
~properties:
|
|
|
|
|
|
tmxFile//地图文件
|
|
|
|
|
|
mapLoaded//地图加载是调用的函数
|
|
|
|
|
|
~function:
|
|
|
|
|
|
getMapSize()//
|
|
|
|
|
|
setMapSize()//
|
|
|
|
|
|
getTileSize()//
|
|
|
|
|
|
setTileSize()//
|
|
|
|
|
|
getLayer(name)//returns TieldLayer
|
|
|
|
|
|
getObjectGroup(name)//returns TMXObjectGroup
|
|
|
|
|
|
getPropertiesForGID(GID)//returns Object(属性字典)
|
|
|
|
|
|
|
|
|
|
|
|
# CC.TieldLayer
|
|
|
|
|
|
getPositionAt(pos)//returns Vec2(像素坐标) 参数是瓦片坐标
|
|
|
|
|
|
removeTileAt(pos)//瓦片坐标
|
|
|
|
|
|
getTileGIDAt(pos)//returns Number(全局唯一标识,0为空)
|
|
|
|
|
|
getTileAt(pos)//returns _ccsg.Sprite //removeChild(sprite);
|
|
|
|
|
|
setTileGID(gid,pos)//相当于在pos位置添加GID的图块(原来的图块删除)
|
|
|
|
|
|
getTileSize()//
|
|
|
|
|
|
setTleSize()//
|
|
|
|
|
|
getMapTileSize()
|
|
|
|
|
|
|
|
|
|
|
|
# TMXObjectGroup:
|
|
|
|
|
|
~properties:
|
|
|
|
|
|
~function:
|
|
|
|
|
|
var getObject(var objectName)//返回属性字典
|
|
|
|
|
|
# _ccsg.Sprite://cocos js 里的Sprite,继承自CC.Node,而不是组件
|
|
|
|
|
|
~properties:
|
|
|
|
|
|
x
|
|
|
|
|
|
y
|
|
|
|
|
|
width
|
|
|
|
|
|
height
|
|
|
|
|
|
opacity
|
|
|
|
|
|
...//节点的属性都有
|
|
|
|
|
|
~function:
|
|
|
|
|
|
var setSpriteFrame(var spriteFrameName)
|
|
|
|
|
|
var runAction(var action)
|
|
|
|
|
|
...//节点的方法都有
|
|
|
|
|
|
```
|
|
|
|
|
|
|
|
|
|
|
|
- 图块放置的位置是基于像素坐标,而图块在map中的索引是基于瓦片坐标(整数),所以在脚本文件中要适时转变
|
|
|
|
|
|
|
|
|
|
|
|
- 对象层的对象(比如我们上面做的两个player point),在Cocos Creator中是不会显示的
|
|
|
|
|
|
|
|
|
|
|
|
- 对象层记录的是位置信息,图层记录的是图片信息
|
|
|
|
|
|
|
|
|
|
|
|
- .tmx文件其实保存的图块的一种映射关系,所以图块文件和地图文件要始终放在一起,不然可能会显示出错
|
|
|
|
|
|
|
|
|
|
|
|
- GID是图块在一个地图文件中的唯一ID,(图块指的是右下角的图块文件,每一个图块都不相同,瓦片指的指地图中的块,可以是相同的图块),GID为0说明该Tile的图块为空
|
|
|
|
|
|
|
|
|
|
|
|
- 当利用getPropertiesForGID(GID)之类的方法时,得到的返回值是属性字典,可以直接通过点方法得到其属性值,属性值都是字符串类型
|
|
|
|
|
|
|
|
|
|
|
|
- 当用到getTileAt(pos)时,得到的返回值是Cocos2d 的Sprite,而不是Cocos Creator的Sprite,相关方法可以查找Cocos2d js的API,需要注意的一点是,Cocos2d的Sprite是继承自节点的,而不是组件式,所以我们可以直接这样写“mySprite.x = 100”而不是“mySprite.node.x = 100”
|
|
|
|
|
|
|
|
|
|
|
|
- 地图中同一层只能使用一张图集里的图块
|
|
|
|
|
|
|
|
|
|
|
|
注意:本教程资源部分来源于网络
|